Hiển thị các bài đăng có nhãn Tutorial video. Hiển thị tất cả bài đăng

Thứ Ba, 8 tháng 11, 2011

Macrame dragonfly tutorial

http://th05.deviantart.net/fs11/PRE/i/2006/207/8/9/Dragonfly_knot_by_MrJin.jpg

Tutorial: Chinese Knot Dragonflies


macrame dragonfly tutorial
1. Double the cord to make two equal lengths
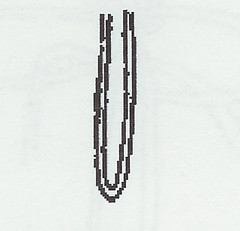

2. Let the ends fall as shown leaving the center loop be the length of the dragon fly that you are making. This is the length of the body. Here is where you can add beads for eyes. They go on at the top of the “M”
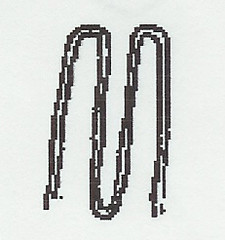

3. Bring the right leg over and under as shown.
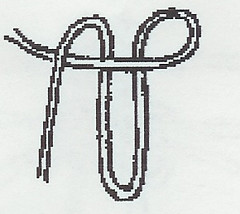

4. Bring the left leg behind the body and through the loop as shown.
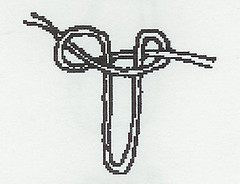

5. This repeats step 3 in the reverse direction
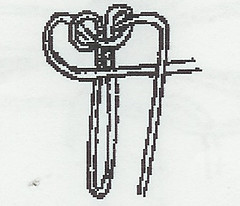

6. This repeats step 4 in the reverse direction. A complete square knot is formed. You may choose to do one or two complete square knots to form the head of the dragonfly.
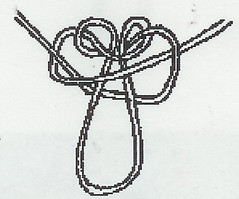

7. The first wing pair is formed as in step three. Allow enough length to produce proper wing to body proportion.
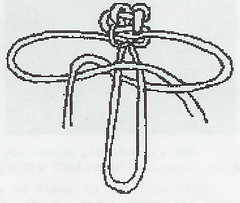

8. Complete the square knot as in step 4. Take care in tightening the knot to allow the wing lengths to stay equal. Tighten carefully and slide the knot up the body loop to the desired position.
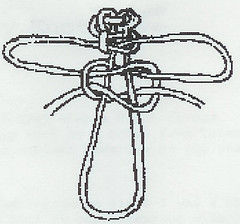

9. Add a second wing set as in step 7 and step 8. Tighten the second wing set and move to position. The body is then completed by square knotting as in steps 3 through 6 above, down the length of the body loop.
10. Tighten carefully as you go. Ending can be completed by trimming loose ends and applying a dot of glue to secure.
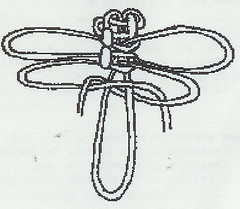

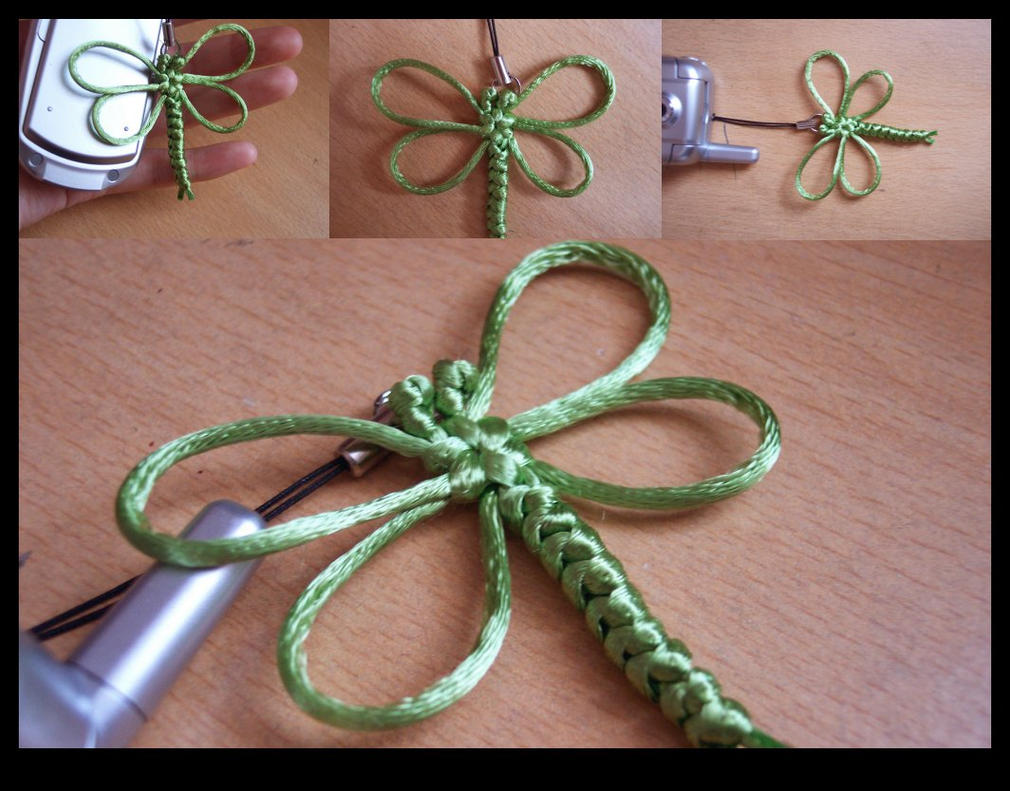
and the finished dragonfly:
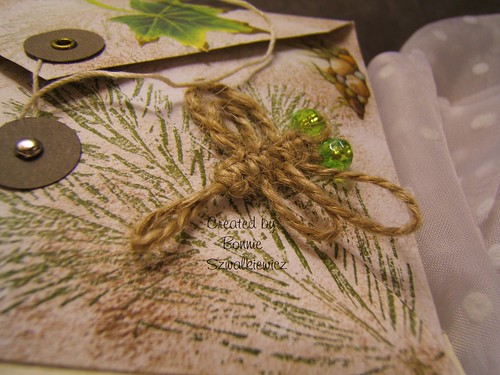
2009-01-14 010

 Read more: http://craftiblog.wordpress.com/2006/04/22/macrame-dragonfly-1/

Thứ Tư, 5 tháng 10, 2011

Crafty jewelry: Wirewrapped Rosette Ring , video tutorial

Crafty jewelry: Wirewrapped Rosette Ring , video tutorial


Wirewrapped Rosette Ring Tutorial

Handmade Wire Wrapped Jewelry

Chủ Nhật, 2 tháng 10, 2011

Paper crafts for kids: Origami Spring Bunny, video tutorial

https://blogger.googleusercontent.com/img/b/R29vZ2xl/AVvXsEiTrkK1FNb3t2sPBbGAp_E_1JFEy_nfafqqtmp0R6KjVn_ENJJVTQAou3n21Em38XmIeh_-AHqbm7KCG47Pm0ZsuFXH426gNnYqKGdJd1TeKtvyCMzimlfN1ObE5Lkt2swFgKvaRKkUKeCk/s200/origami+bunny3.jpg
 Paper crafts  for kids: Origami Spring Bunny, video tutorial
I found the awesomest tutorial for inflatable Origami Bunnies on You tube. I went a little bonkers and made a whole herd of bunnies living in their cozy little warren. Wanna see??
And, this wouldn't be a craft blog if I didn't include something involving sheet music. So, here you have it, a sheet music bunny:

How about some Bunnies with Whiskers?? I couldn't decide which I liked better. To make the whiskers I just used 3 pieces of hemp rope, hot glue them to the face, and a little pink felt triangle hot glued on top:
How To Make an Origami Inflatable Bunny

How To Make an Origami Inflatable Bunny on Howcast

If you are interested in making your own check out this video!!


How To Make an Origami Inflatable Bunny on Howcast

Thứ Bảy, 1 tháng 10, 2011

Craft present for kids: Crochet Baby Cap Two Pom Poms - video tutorial


Craft present for kids: Crochet Baby Cap Two Pom Poms - Option A


If you are a beginner, you can find a playlist for the basic crochet stitches by clicking on this link. Beginner Crochet Stitches 

Note: If you made this cap with the pom poms, it does have small yarn tails that may come out of the yarn pom-poms. Please keep this in mind around small babies and children.
Written by Teresa Richardson

Skill Level - Beginner/Intermediate
Abbreviations
DC - Double Crochet
HDC - Half Double Crochet
CH - Chain
SL ST - Slip Stitch

FPDC - Front Post Double Crochet
BPDC - Back Post Double Crochet


DefinitionsFront Post Double Crochet - Put your hook to the right of the stitch, around the post and up the opposite side.  
Complete the double crochet.
Left Hand Front Post Double Crochet - Put your hook to the left of the stitch, around the post and up the opposite side. Complete the double crochet.

Back Post Double Crochet
 - Put your hook to the backside right of the stitch, around the front, to the left. Wrap the yarn over, pull it through, complete the stitch.

Left Hand Back Post Double Crochet - Put your hook to the backside left of the stitch, around the front, to the right. Wrap the yarn over, pull it through, complete the stitch. 

Continual Round -
 Put your hook through the top of the first stitch and work the single crochet or stitch that you are working.  This technique is worked instead of joining, to eliminate the seam that will show up when you join rounds.


Yarn Marker -  Marker for the first stitch of each round. I use scrap pieces of yarn to mark the first stitch.  
Work a loose chain of 42. Make sure the chain is not twisted. Join with the beginning chain.


Round 1: Work a chain 1, this will not count as a stitch.  In the same chain, work one double crochet. Work one DC in each chain around for a total of 42 double crochet. Join with the beginning stitch.


Round 2-3: 
Work a chain 1, this will not count as a stitch.  We will be working a series of post stitches. *Work a front post double crochet. (see definitions above for details on how to work the FPDC) Work a back post double crochet for each of the next two stitches. (see definitions above for details on how to work the BPDC, continue around from * for a total of 42 stitches. Join with the beginning stitch. Cut the yarn and change color.

Round 4-11: Attach the new color of yarn to the top of any stitch. Work a chain one, single crochet in the same stitch.  Work 1 SC in each stitch around for a total of 42. Work the continual round.  You may want to use a yarn marker to mark what would be the first stitch in each round.  Upon completion, cut a long length of tail. This will be used to sew the top of the cap shut. 


Thread your tapestry needle and turn the cap inside out. You will skip 6-7 stitches on each side, sewing the top, center shut. Knot and secure the strand when you get to the to the other side.  Hide the tail between the stitches. Flip the cap right side out.

Cap Corners: Attach the yarn to any stitch in the corner of the stitches that were left un-worked.  Work three rounds of single crochet. This is to make the corner stand up a little higher than the rest of the cap.  Both sides will be done the same way. Slip stitch to finish off, cut off some extra yarn.  Weave the tail through the last round, pull the top shut. 

Attaching Pom-Pom: You will run your needle through the center of the pom-pom 5-10 times making sure it is secure. When you go back through, make sure it is slightly over from where you came up so you don't pull your yarn through.  When it is secure, make a knot underneath the ball. Hide the tail between the stitches.


Flower gifts: Edible Centerpiece, The Veggie Bouquet tutorial

edible vegetable bouquet
Most of you have probably seen an edible bouquet before – usually of the fruit or cookie variety – but this particular design is definitely a stand-out!
The edible veggie bouquet pictured above is from Marley Majcher‘s 40th Birthday Party (more details coming soon) and serves as great inspiration for a super-stylish take on this idea… from the choice and arrangement of the veggies to the chic display in a simple glass cylinder vase filled with black lentils.
This would be an impressive addition to the appetizer buffet for everything from parties & showers to Mother’s Day brunch! Here’s another design that features skewered veggies spraying from a melon “basket” garnished with thyme:
edible vegetable bouquet
I’m also loving the idea of doing “mini versions” of edible bouquets for guests in lieu of individual salads – and serving them in small terracotta pots with a side of veggie dip. I’m definitely going to play around with that idea soon… =)
And below is a video I found with some DIY info on creating edible bouquets… You do have to sit through a 30-second ad to get to the video, but once you get to it, there’s some good DIY info in there about 2 types of edible bouquets: one fruit version and one veggie version featuring clever “roses” make from asparagus and radishes.


How to Make Edible Bouquets

Flower gifts: Edible Centerpiece, The Veggie Bouquet tutorial

Hair style for women: Sock Bun Tutorial

http://farm6.static.flickr.com/5128/5242812098_1bece3e16e.jpg
Hair style for women: Sock Bun Tutorial


Sock Bun video Tutorial

Thứ Năm, 29 tháng 9, 2011

Craft lessons: Waldorf Finger Knitted Flowers, video tutorial

Fingerknitted Flowers

One thing I would love to have in my house is live plants or better yet, fresh flowers, but with two kitties it's just not an option. So, I had to improvise...

A bouquet of cat and kid friendly, all natural, homemade flowers. I found a video tutorial
They were quick and easy to make - I simply fingerknitted the flowers and sewed them onto the branches from our wool tree.


Craft lessons: Waldorf Finger Knitted Flowers, video tutorial

Thứ Ba, 27 tháng 9, 2011

Unique gifts: Gold fish for gifts

well...you asked for a how to vid on the fishy barrettes...and i had to do what the people wanted!...lol...now keep in mind...this is my first vid...so bear with me!..and you can only watch it if you promise not to make fun of me!...i realize i have alot to learn on the movie making business...but i think from what a managed to actually get on camera...you'll be able to make one of these!...lol...enoy!...

Photobucket
Unique gifts: Gold fish for gifts

FISHY BARRETTE video tutorial

Thứ Ba, 13 tháng 9, 2011

Hair style for teen: 6 Quick Summer Hairstyles


Hair style for teen:
Video tutorial

6 Quick Summer Hairstyles

Gift presents for women: How to Tie a Scarf

How to Tie a Scarf: Rosette Wrap


How to work that scarf Chapter Two

Paper Craft Tutorial: 3D Paper Flower


3d paper flower tutorial using the retro paper shaper flower punch


Craft lessons:

Thứ Năm, 8 tháng 9, 2011

Makeup : video tutorial

Gift presents for teen


Eye makeup tutorial


lips


Thứ Tư, 7 tháng 9, 2011

Craft lessons: Video knitting and crochet tutorial


How to knit a sunflower


How to tie a two-tiered Irish Rose.


How to crochet a daisy.

Video - lesson on crochet baby panamku.


Crochet unusual motif - a circle within a square.


Knitting on the fingers vemste with children


Knitting on the fingers of a flower


Craft lessons: knitting video tutorial

Video.Esche knitting

How to crochet flowers. change thread


Thứ Ba, 30 tháng 8, 2011

Craft lessons: snack bags! a sewing tutorial video

snack bags! a sewing tutorial video

IMG_6653
Craft lessons: snack bags!  sewing tutorial video
   We have been eating in the park, on the beach, and at concerts a lot this summer and needed some non-plastic reusable snack bags.   
IMG_6653

We have been eating in the park, on the beach, and at concerts a lot this summer and needed some non-plastic reusable snack bags.

I know I am a little behind the curve on this, but with the girls being homeschooled, this food packing stuff hasn't been a big issue—no lunches to pack everyday and all that. Of course, we have to carry our food in something. Food folded up in cloth napkins in a wicker basket doesn't always cut it—you know what I mean? It's all cool to play Little House Old-Timey Lunch until a sandwich falls in bark dust.

So, after dorking around this morning I made some cloth baggies. These were so easy and fun I made a little tutorial for them. There's no velcro on these—super easy. All you need is a sewing machine and some fabric. Here's a link to it if for some reason the player below is busted.

Chủ Nhật, 28 tháng 8, 2011

Crafts lessons: Make and Decorate a Diva Heart Cake

Make and Decorate a Diva Heart Cake


Video tutorial

Craft lessons: Fondant Flowers TUTORIAL


Valentines-cake-with-roses1 (466x700, 65Kb)
Craft lessons: Fondant Flowers TUTORIAL
White-chocolate-fondant-test (466x700, 186Kb)

Fondant Flowers


Rolling and Cutting Fondant

making fondant roses
   

Thứ Tư, 24 tháng 8, 2011

Craft lesson: crochet a flower video tutorial

how to crochet a flower video tutorial

One thing I love about crocheting is that there are so many ways you can use it to create embellishments. From decorative edging to flowers, you can dress up a t-shirt or a scrapbook page with your hook and just a little yarn. Lately I've been obsessed with crocheting little flowers--maybe because they're so quick and satisfying! I altered a few other flowers I'd tried and came up with my favorite 5-petal flower pattern. I'm sure I didn't invent it, but it came about for me by trial and error and it turns out cute with almost any kind of yarn. Here are a few items I've made recently with flowers.


If you want to make your own, we've made a short video tutorial to show you just how to do it. I'm a visual learner, so I know some of you out there just need to see it done once to figure it out. Check it out, then find the written pattern below. WARNING: This is not a general crochet lesson. You'll need to know how to do a few basic stitches to complete a flower.


It's a bigger picture, but the picture and sound quality aren't as good.

Mandy's Favorite 5-Petal Flower Pattern

Materials:
Any size hook (depending on what size flower you want)
Any weight yarn

Rnd 1: Ch 5, join into a ring w/sl st in 1st ch.
Rnd 2: Ch 3 (counts as first dc), work 9dc in ring, join to top of ch w/sl st -- 10 sts.
Rnd 3: **Ch 2, work 3dc in next st, ch 2, sl st in next st** five times. Fasten off.

For a different color center, try changing yarn colors after round 2. Experiment with different weight yarns and hook sizes. To layer a slightly smaller flower on top, go down one hook size from larger flower.

 
littlebirdiesecrets.blogspot.com

Thứ Hai, 22 tháng 8, 2011

Craft lesson: How to knit backwards (from left to right knitting)


Craft lesson: How to knit backwards (from left to right knitting)


Craft lessons: transform fashion, beautiful craft ideas and tutorial


Craft lessons: transform fashion, beautiful craft ideas and tutorial
Free crochet patterns


Tape lace - a fairly simple and very nice reception crochet. The essence of his knitting - is to create bands that have followed, both vertically and horizontally, sometimes on the diagonal.They are then fastened together.

Joining the band as you can lace tape by simply stitching the inside out, and tying the gaps between bands.

On a secret connection strips lace ribbon through extended periods in places where it is needed, will be discussed in my little trailer.
In order to increase the distance between the strips of lace, and were invented by the author of some common elements - the air of a chain of loops with "knobs".
To learn how to connect the strips together and simultaneously weave crochet inset with"knobs" and tell these two clips.

Labels

Accessories afghan Amigurumi amirugumi Art Ẩm thực baby crochet baby knitting Baby learn bag Bags balloons Bé học toán Bé tập vẽ Bé tô màu Bead belts books booties bows boxes bracelet cake candles candy Cards carving carving fruit carving fruits Cắm hoa Cắt may Chơi mà học clay coloring Coloring - Tô màu crafts crochet crochet pattern cross stitch Curtain cutting paper Doll Dolls drawing dress Đan Đan len earring Easy dot Embroidery Embroidery - Thêu fashion Felt Floral arrangements - Cắm và bó hoa flower arrangement flowers crochet Folding paper Folding towels food food decor Funny garden Gấp giấy Gấp hộp Giầy - Dép gift Gifts glass gloves Hair hair clip hat hats Họa sĩ nhí holiday craft holiday crafts home and garden jewelery jewelry Kết hạt Khăn - Mũ kirigami knitting knitting pattern knot Lam do choi Làm đẹp Làm đồ chơi Làm hoa vải Làm thiệp macrame Magazine make up making flower making flowers Making flowers - Làm hoa Making toys Mẫu móc mittens Móc nail Nail art necklace necklaces Nến trang trí Nhà đẹp or Origami Origrami painting Paper Patchwork Phim pictures pillow Pillows plastic Play and learn for baby poncho Quilling paper Quilt recycle recycling repair work ribbon ring rings rugs Sách tiếng anh cho bé scarves sewing shawls shoes and sandals skirt skirts slippers soap socks sweater tablecloths Tatting Tết dây Thêu Thiệp Trang điểm Trang trí Túi xinh Tutorial Tutorial video underwear Valentine's day Video video tutorial weaving wedding wood